DGST 201

Jennifer Hill

Vibe Check: RELOADED —

Hello everyone and welcome to my final project blog post! For my final project, I decided to revisit and extend my Vibe Check project. My initial foray into p5.js was so satisfying that I wanted to continue making my dream for Vibe Check a reality.

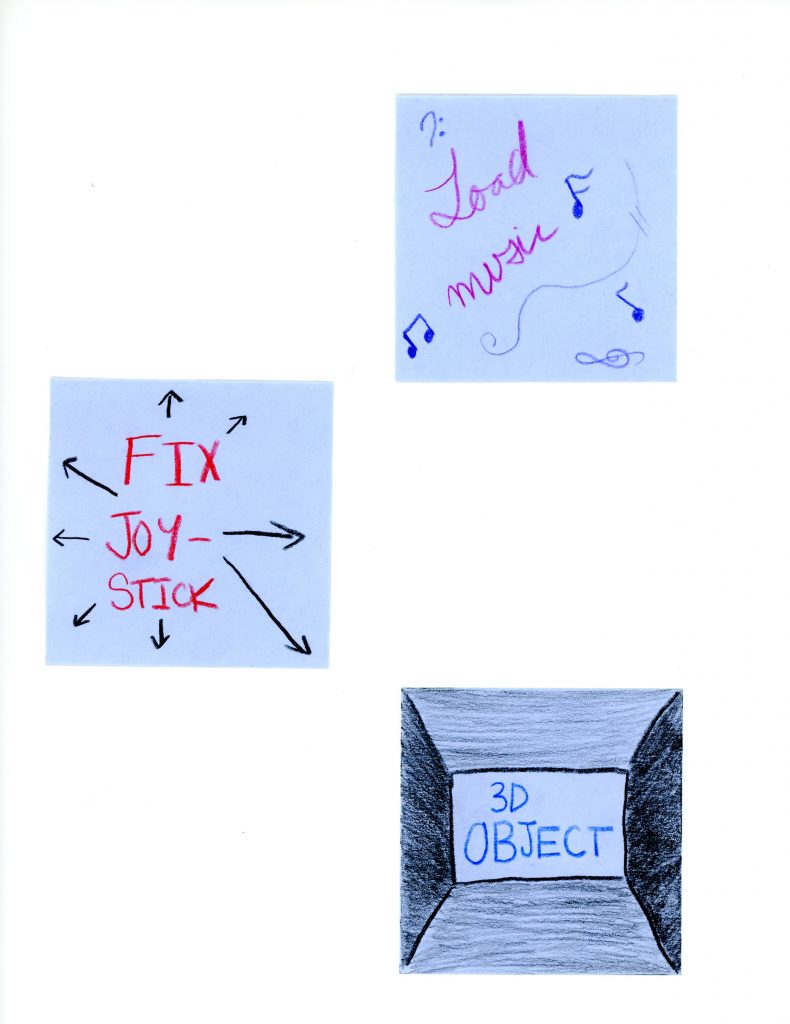
To begin, I set up my Vibe Check again and wrote down on some sticky notes some things that I would like to improve in this project or things I would like to add. These notes included fixing the joystick, incorporating 3D objects, and acquiring music. Unfortunately, my attempts to fix my joystick, which moved in the opposite direction of where you pointed it, were met with failure and I quickly gave up on finding what the issue was. 

Sticky notes with various fixes to be done to my project.

Otherwise, based on these brainstorming sticky notes, I started researching how to go about creating if/else statements on p5.js to cause different reactions based on where the “vibe” was charted. In the first installment of Vibe Check, I kept coming across a Youtuber called The Coding Train and it was finally during this project that I was able to find exactly what I was looking for. Specifically, his tutorial on Conditional Statements in p5.js was extremely useful to me and helped me set up branching logic in my program. 

Figuring out how to cause certain reactions when on specific parts of the screen was the most difficult part of this project as I am a novice JavaScript coder. To overcome this gap in knowledge, I used p5.js’ excellent documentation on images. Through these guides and extensive debugging, I finally figured out which combination of logic operators and variables would make the effect I wanted my sketch to have. Figuring this out gave me the “aha” moment I was looking for and helped me feel confident in my ability to load 3D models into my environment.

Paper with brainstorming.

Once more, I watched a Coding Train tutorial to learn how to use WebGL, which is the feature that allows p5.js users to upload and display 3D objects. After watching this tutorial, I began to explore the web for Cat in the Hat 3D files. I had a lot of issues trying to find a 3D file that worked and was simple as p5.js had a hard time reading complex vertices. After much spelunking, I finally came across this Cat in the Hat 3D object that I quite liked and was simple enough for p5.js to read. Furthermore, I used the material and texture options in p5.js to give my models more customization. 

Lastly, I wanted to include music or sound in one of my branching statements. I had not worked with sound in p5.js before, so I consulted their very useful sound library documentation which taught me how to load and play sound. For my project, I decided to include a simple sound that “glitches” based not on a p5.js sound effect, but flawed logic in my branching statement. My sound, which is a man saying “vibe check”, was generated using a text to speech generator and took advantage of an if loop to play the sound multiple times out of sync. I think that exploiting the technicalities of my conditional statements is something I did well in this project as it demonstrates my simultaneous ineptitude and dexterity with code. Also, including sound was something I felt important to have in my project and was fairly easy after I consulted the proper documentation. Below is my Vibe Check: RELOADED.

Working with p5.js and Arduino has been a dream. I never thought that I would get the opportunity to work with digital and physical components simultaneously before. Even though at times it has been utterly frustrating, this project has also been very fulfilling for me as I have built my confidence in code and tinkering. While there are still improvements I would like to make on this assignment (*cough*the darn joystick*), I had lots of fun making this project and enjoyed exploring coding in a way that I have not had the confidence or ability to do before. Find my code below.

p5.js:

var serial;
var portName = 'COM6';
var xValue = 0;
var yValue = 0;
var button = 1;
angle = 0;

function preload() {
  cat_in_hat = loadModel('cat_in_hat.obj', true);
  jenn_img = loadImage('jenn.png');
  cat_hat = loadImage('cat_hat_small.png');
  vibe_check_txt = loadFont('comic_sans.otf');
  song = loadSound('speech.mp3');
  fur = loadImage('fur.jpg');
}

function setup() {
  createCanvas(800, 400, WEBGL);
  serial = new p5.SerialPort();
  serial.on('list', printList);
  serial.on('connected', serverConnected);
  serial.on('open', portOpen);
  serial.on('data', serialEvent);
  serial.on('error', serialError);
  serial.on('close', portClose);
  serial.open(portName);
}

function draw() {
  background("#100c08");
  fill("#00FF00");
  textSize(16);
  textFont(vibe_check_txt);
  textAlign(LEFT, TOP);
  words = text("VIBE CHECK LADZ", 5, 5);
  image(jenn_img, 5, 15, 0, 0);
  imageMode(CENTER);
  noStroke();
  
  if (button === 0) {
    image(cat_hat, xValue / 2, yValue / 2);
    song.stop();
    
  } if (button === 1 && xValue > jenn_img.width) {
    clear();
    background("#d9fdff");
    rotateX(angle);
    rotateY(angle * 1.3);
    rotateZ(angle * 0.7);
    angle += 0.03;
    
    normalMaterial();
    model(cat_in_hat);
    song.play();

  } if (button === 1 && xValue < jenn_img.width) {
    ambientLight(200);
    ambientMaterial(200, 87, 70);
    rotateX(angle);
    rotateY(angle * 1.3);
    rotateZ(angle * 0.7);
    angle += 0.03;
    model(cat_in_hat);
}
} 
  
function printList (portList) {
  for (var i = 0; i < portList.length; i++) {
    console.log(i + " " + portList[i]);
  }
}

function serverConnected() {
  console.log('connected to server.');
}

function portOpen() {
  console.log('the serial port opened.')
}

function serialEvent() {
  var data = serial.readLine();
  if (data.length > 0) {
    //console.log(data);
    var sensors = split(data, ",");
    if (sensors.length > 2) {
      xValue = sensors[0];
      yValue = sensors[1];
      button = int(sensors[2]);
    }
  }
}

function serialError(err) {
  console.log('Something went wrong with the serial port.' + err);
}

function portClose() {
  console.log('The serial port closed.');
}

Can I Get a Vibe Check, PLEASE? —

Hello everyone and welcome back to my Tinkering, Hacking, and Making Website! In today’s post, I am going to be filling you in on the last two coding projects I have done.

The Yeet Machine

The first project I completed was a smaller, less involved project that had us experimenting with Microbits. I had never worked with Microbits before, so I was very excited to play with it and code something on it. My idea for my project was inspired by the old Nerf footballs with the spin counter in them. I also drew inspiration from the iconic and hallowed, “THIS BITCH EMPTY, YEET!” Vine. With all of these pieces in mind, I made “The Yeet Machine.” When turned on, it prompts the user to throw it. During the throw, the Microbit reads “YEET!” After the throw is complete, a user can see how strong their throw was by pressing button A. By pressing button B, the user completes a “Vibe Check.” This is simply reading the Microbit’s photoresistor and determining whether it is lit or not based on how much light is in the user’s surroundings.

Link to Microbit project

I liked working with the Microbit as its simplicity made me think of a unique way to create a full experience based on very little input. However, I did run into some initial difficulty as I didn’t realize the Microbit doesn’t have a built speaker. Originally, I was going to have the Microbit play the “YEET!” sound when it was thrown, but this proved too troublesome. It was really fun to work with the Microbit and it helped inspire my bigger project, which I have named “Vibe Check.”

Vibe Check

In terms of the requirements for the larger project, Professor Meadow’s asked us to use either a Hummingbird board or an Arduino board. Once we selected our board, he wanted us to build and code an interactive machine or device around this board. This device is also required to have input from environmental sensors (e.g. temperature, light, motion) that caused a reaction.

Needless to say, when I heard these criteria I was stressed. However, I decided to take into consideration the Yeet Machine and my desire to extend the “Vibe Check” functionality. As per usual for me, my initial, rough idea shot for the stars. It was to include Arduino boards, projection mapping, complex art rendering run on code…The list goes on. I quickly realized that I needed to lower expectations for myself and form a more realistic vision for my project. 

While reexamining my project idea, I tried to maintain the inspiration for my project. This project is inspired by the Tisch Interactive Media Arts School, which is doing amazing work in the digital/physical realm. Other inspiration for this project came from Professor Zach Whalen’s Creative Coding class and their amazing p5.js projects. Together this inspiration pushed me to create a project that allowed me to further my knowledge of Arduinos and to learn p5.js.

I must admit that before I started this project, I had no knowledge or understanding of JavaScript. Consequently, before I formulated the exact parameters of my project, I had to watch a lot of p5.js tutorials. I began by watching these very useful video tutorials by Jeff Feddersen, who teaches electronics and energy at NYU. In these videos, he is joined by Arduino co-founder, Tom Igoe. The first video I watched, Serial Output From Arduino, taught me how to connect the Arduino to p5.js via Serial Port. Serial port is a handy library that allows the Arduino to use my computer’s serial port, or USB port, to receive or transmit data. I am honestly very grateful for Jeff and Tom’s videos because working with serial port sounded scary at first, but after this video, I felt comfortable and confident in using it. Once I had mastered the first tutorial, I moved onto the Serial Out as ASCII and Serial Out ASCII 2 videos. It was through these videos that I specifically learned how to receive information from a joystick and how to use input values to trigger a certain response on p5.js. I also found these notes that Tom Igoe wrote and Yeseul Song revised about using input from a joystick. I always find it useful to receive my information in multiple modes, so having the notes helped me understand the videos more.

Once I had felt I had learned enough about p5.js and the serial port, I began to code Vibe Check. My plan for Vibe Check was as follows: to use a similar concept to Jeff and Tom where the joystick values translate to action in p5.js, but to add more decoration and, well, memes to it. To begin, I transcribed the code Jeff and Tom had in their video and tried to get that to work. Once I succeeded in that, I began remixing the code for what I had in mind. It was while working with the x and y values of the joystick that I naturally concluded to use these values for a graph that charted a user’s vibe. Once the user was at a point that reflected their vibe, they could click the button and the Cat in the Hat would appear. Below is my code for my Arduino and my p5.js code. 

Arduino:

void setup() {
  Serial.begin(9600);
  pinMode(2, INPUT_PULLUP);
}

void loop() {
  int x = analogRead(A0);
  delay(1); 
  int y = analogRead(A1);
  delay(1);
  int button = digitalRead(2);
  Serial.print(x);
  Serial.print(",");
  Serial.print(y);
  Serial.print(",");
  Serial.println(button);
}

p5.js:

var serial;
var portName = 'COM6';
var xValue = 0;
var yValue = 0;
var button = 1;

function setup() {
  createCanvas(800, 400);
  jenn_img = loadImage('jenn.png');
  cat_hat = loadImage('cat_hat_small.png');
  serial = new p5.SerialPort();
  serial.on('list', printList);
  serial.on('connected', serverConnected);
  serial.on('open', portOpen);
  serial.on('data', serialEvent);
  serial.on('error', serialError);
  serial.on('close', portClose);
  serial.open(portName);
}

function draw() {
  background("#100c08");
  fill("#00FF00");
  textSize(16);
  textFont("Comic Sans MS");
  text("VIBE CHECK LADZ", 25, 25);
  textAlign(LEFT)
  image(jenn_img, 0, 0);
  noStroke();
  if (button === 0) {
    ellipse(xValue / 2, yValue / 2 , 50, 50);
    } 
  else if (button === 1) {
    image(cat_hat, xValue / 2 - 75, yValue / 2 - 75);
  }
}

function printList (portList) {
  for (var i = 0; i < portList.length; i++) {
    console.log(i + " " + portList[i]);
  }
}

function serverConnected() {
  console.log('connected to server.');
}

function portOpen() {
  console.log('the serial port opened.')
}

function serialEvent() {
  var data = serial.readLine();
  if (data.length > 0) {
    //console.log(data);
    var sensors = split(data, ",");
    if (sensors.length > 2) {
      xValue = sensors[0];
      yValue = sensors[1];
      button = int(sensors[2]);
    }
  }
}

function serialError(err) {
  console.log('Something went wrong with the serial port.' + err);
}

function portClose() {
  console.log('The serial port closed.');
}

(If you are not familiar with the vibe check meme, I bet you weren’t expecting me to say Cat in the Hat. The very end of this video should bring some clarification to the Vibe Check, but simultaneously it’s a confusing meme that honestly just expresses how much things are not vibing right now.)

With my concept and code for the most part down, I then focused on getting my physical board and Arduino working together. For this project, I used an Arduino Uno and a simple joystick. I began my project trying to use an Arduino Huzzah, but I quickly realized that it was greatly limited in terms of inputs and outputs. Switching to the Uno helped me move further along and have more control over the wiring. In terms of actually wiring things together, I used this guide as I had never used a controller of this variety before. Below is a video that details my design process. 

Overall, this project was very challenging, but also very fulfilling. I ran into extensive issues with my Arduino IDE and had to restart my computer and drivers a million times. However, these difficulties helped me deeply understand the ways the board, serial port, and p5.js all talked to each other. Moreover, I found it easy to create this project as it did have some elements that I am very confident in (e.g. Photoshop to create the graph and the Cat in the Hat symbol). If I were to do this project again, I would figure out a way to make the Cat in the Hat image stick, almost like pinning the tail on a donkey. I think that figuring that functionality out would extend the experience and add more humor to it. All in all, I really liked this project as it pushed me out of my comfort zone and allowed me to play with physical computing.


Overzealous Obstacle, I Absolve You! —

Mind Block

Warning: Loud Noises (screams)

Click Here to See Mind Block

I have been avoiding this assignment for the last two weeks because I have been so uninspired. Typically, I like my work to have meaning, to be inspired, driven, and with a clear purpose. I’m not saying this piece isn’t any of the above, but right before the conception of this project, everything felt worthless, unimpressive, and oh so dull. I was expressing these qualms to my roommate a few nights ago when we joked that I should personify the mind blocks preventing me from creating one of my more involved works. So, I did just that.

To begin, I went to the trusty Noun Project. I found this simple block that I thought would be perfect for the body of my sprite. While further spelunking on the Noun Project, I found this André Luiz’ collection called Eyes o.o. This series was perfect for my project and gave my blocks very cartoon-like expressive eyes. For the first block, I had the eyes in their normal state looking worried and then switching to this wide-eyed look. The second block also had a wide-eyed look that alternated to a tiny, concerned eye expression when it touched the other block. 

In my project, I had my two blocks gliding around randomly and then switching costumes when they touch. Moreover, the two blocks talk to each other when they touch. I did this by writing two lists, Block 1 and 3 responses, and populating them with expressions such as “yike” and “big mood.” These expressions evoke the feelings I had when I was procrastinating and feeling apathetic. Working with the lists was pretty difficult, but I managed to figure them out and use them to make the blocks appear to be having some dialogue. 

Additionally, when the two blocks touch a scream is exuded. These screams represent the pain I felt when I was uninspired and unmotivated. The screams change pitch every time as Scratch chooses a random pitch value. Another feature of my Scratch project is the brain spinning background gif. I found this brain spinning video on Videoblocks and then used ezgif’s video to gif converter to edit it. I then used ezgif’s handy split into frames option to extract the frames and upload them into Scratch. Scratch is capable of reading .gif files, but I ran into issues with it uploading the .gif frames out of order. Thus, I found it easier to use ezgif’s split into frames option. Regarding the requirements, technically, we were asked to have three different backgrounds. Well, technically, a gif is made up of multiple image frames “playing” sequentially. So, technically, I have 150 backgrounds. 

I do have two additional backgrounds on my Scratch that are hidden until you press the space bar. Pressing the space bar reveals a new brain, one that is liberated from the mind blocks that plagued it. A message, which reads “At last, I’m free,” is also exposed when the space bar is pressed. The image and message together represent the catharsis one feels when they finally break through a debilitating mental block. 

This project has been an excellent opportunity for me to learn how to work through my mind blocks that afflict my creative process. Through this, I was able to learn that it is perfectly normal to start a project uninspired. This revelation helped me come to terms with the expectations I set for myself. Not every work has to be my magnum opus. It was through truly embracing my indifferent and unmotivated state that I was able to create an engaging work that expresses a pain I deal with while creating. Truly, I enjoyed being able to accept my status as a struggling creator and turning this pain into something productive.

Conclusion

If I were to do this project again, I would try to spend more time understanding the inner workings of Scratch. I spent a lot of time searching for documentation on the Scratch Wikis for how to do something when I could have been putting more of that time into my work if I had spent the time to experiment with Scratch more. However, I do have to say that the Scratch Wikis are extremely helpful and comprehensive. All in all, I enjoyed this assignment as it allowed me to experiment with code in a way that productively expresses my current feelings.


3D Print My World —

Every December at the Digital Knowledge Center (DKC), we decorate the office and our holiday tree. Of course, we have the usual bobbles and fairy lights adorning our tree, but there always seemed to be something missing. The first year I worked at the DKC, I 3D printed a miniature menorah and a Christmas ornament. While searching for other ornaments for our tree, I noticed a distinct lack of prints for non-Christmas holidays like Kwanzaa, Diwali, and the Winter Solstice. I was extremely disappointed and I decided that someday I would create prints to fill these gaps. A few years have passed since that experience, and I am happy to report that Kwanzaa now has a few decorations available to print on Thingiverse. However, the other holidays are still severely underrepresented. Thus, I decided that for my 3D print project I was going to make prints for Kwanzaa (for the sake of more options), Diwali, the Winter Solstice, and Las Posadas (more on this later). 

Kwanzaa

Thingiverse

Kwanzaa ornament.

Before I began designing my Kwanzaa ornament, I decided that I must take some time to do thorough research on the traditions and design features of it. I began by watching these two YouTube videos to give me a full overview of this holiday. These videos specifically inspired me to make the kinara, the candle holder used in Kwanzaa celebrations, the centerpiece of the ornament. I went onto the Noun Project and was able to find this kinara that was an ideal hole in my ornament. 

https://www.youtube.com/watch?v=6TGKdq0rhF4

I also decided to look at the greeting cards below for inspiration. These greeting cards encouraged me to use the Teletoon Lowercase V2 font on the ornament as it has character and resembles the fonts below. Choosing to use a non-Tinkercad font meant discovering how to use the Custom Font Text generator on Tinkercad. This was a challenge for me as I had never worked with this side of Font Squirrel before. However, it opened up a lot more possibilities for my design and I ended up using the custom font generator for all of my prints (except the Winter Solstice ornament). 

After adding the kinara and text, I believed I was ready to 3D print my ornament. Before I did this, I asked my close co-worker if they could give me feedback on my designs. She said that it seemed too plain and that there needed to be another element to make it more interesting. Therefore, I went onto the Noun Project and found this nice decorative circle to add to the print. Once I had added the finishing touches to my print, I had to decide what color to print it. I had chosen to print the ornament green, which represents the future and hope that comes from their struggle, but the ThinkLab had run out of green filament. Hence, I chose to print it in black, which represents the people. Printing it in black did make the text hard to read, but my brilliant co-worker recommended coloring the popup text with a bronze sharpie. This genius idea, of course, worked and gave the letters a gold-foil look. 

Diwali

Thingiverse

Diwali ornament.

Once again, I decided to watch a brief video about the holiday before designing an ornament for it. So, I found this interesting video about Diwali and was particularly moved by the rangoli, or patterns created on the floor using materials like colored rice, flour, or sand. I once more went to the Noun Project and found this excellent rangoli that I slightly engraved into the print. I also found a Diwali greeting card that motivated me to use the Amita font on my print. Including this font on my 3D print involved using the Custom Font Text generator as I did on my Kwanzaa print. I did run into some issues with this font and making the text a hole as the letters were not connected to the surrounding print mass. Meaning, that parts of the letter would have fallen off if I had not added squares to connect the hanging portions to the rest of it. After fixing the letters, I chose to print the ornament in a nice fuchsia pink or light purple as that was a color choice I saw in a lot of the Diwali greeting cards I studied.

Winter Solstice

Thingiverse

Winter solstice ornament.

As the celebration of the Winter Solstice spans multiple beliefs and faiths, I decided to concentrate on the holiday as a festival about the sun. After watching the two videos below for research, I found this nice sun on the Noun Project. I ended up duplicating it on Tinkercad and rotating it to make the sun appear more filled out. Something I learned from the videos was the importance of making and sharing wreaths during the Winter Solstice. Consequently, I searched on the Noun Project and discovered this simple wreath that could act as a hole decoration on my print. While researching greeting cards for visual standards, I found that most Winter Solstice greeting cards use a simple serif font. With this in mind, I chose to use a preset font on Tinkercad that matched this aesthetic and could represent a diversity of cultures that celebrate the Winter Solstice. I also decided to print the ornament in gold filament as it is one of the colors of the holiday and emphasizes the holiday’s connection to the sun. 

Las Posadas

Thingiverse

Feliz Navidad ornament.

The last holiday I wanted to create an ornament for is Las Posadas. When I began researching holidays to make ornaments for, I read this article by HerCampus which briefly summarizes holidays besides Christmas. On this list was Las Posadas, which at that time was a holiday I was unfamiliar with. Upon further research, I discovered that Las Posadas was not a separate holiday from Christmas, but more of a culturally dependent festivity associated with Christmas. Meaning, one wouldn’t wish someone a “Happy Las Posadas!” as they would more likely say “Feliz Navidad!”

After acknowledging my gaps in knowledge, I was determined to learn more about Las Posadas and the Latino and Spanish style of celebrating Christmas. So, I found these two YouTube videos and watched them for design inspiration. As Las Posadas mainly involves recreating Mary and Joseph’s journey to the manger, I chose to make the manger the main shape of my ornament. On the Noun Project, I found this excellent stable and edited out the figures of it. Initially in my design, I included a poinsettia in the background of the manager as it is a symbolic flower for the festivity. Unfortunately, the fact that it was a poinsettia was not conveyed and my co-worker advised that I get rid of it to keep the design interesting and effective. While researching, I did find one Las Posadas greeting card. This greeting card was very stylized and moved me to use a flowing script font in my design. This led me to use the Qumpellkano12 font I found on Font Squirrel. The Custom Font Generator was useful again for adding the text to my print. Like with the Diwali print, I had to add a lot of squares to attach the details of letters to the whole mass of the print. This was tedious but ensured that my letters had definition and were more legible. When it came time to print my ornament, I decided to use the red filament as that was the prominent color choice for Feliz Navidad greeting cards. 

Conclusion

I found this project an excellent way to experiment with a lot of different skills in 3D printing. In this project, I mainly wanted to experiment with holes that could let in the Christmas tree lights and shapes that are slightly engraved into the prints. Getting these holes and semi-engravings was hard and required grouping a lot of shapes together to bridge gaps. In fact, one regret I have is that I didn’t do the Feliz Navidad letter grouping as well as I could have. I usually find it easy to work with Tinkercad, but sometimes it can be very frustrating to get the groupings correct and pristine. However, I think I did a good job representing the holiday or celebration with simple, but eye-catching shape combinations. This 3D print project also allowed me to get acquainted with the latest 3D printing software, Dremel DigiLab 3D Slicer. Last time I was frequently doing 3D printing we were using Autodesk Print Studio. Needless to say, Dremel DigiLab 3D Slicer is a nice, refreshing upgrade.

This project has meant a lot to me as representation is an issue I am passionate about. I recognize that it may be problematic that I am a white woman making 3D prints for holidays that I do not celebrate. I hope to overcome this inherent bias by being open to any feedback to my 3D print designs. This project has been very educational and has allowed me to design objects that are important to me and others.